BIG IDEA 1: CREATIVE DEVELOPMENT (CRD)
When developing computing innovations, developers can use a formal, iterative design process or a less rigid process of experimentation. While using either approach, developers will encounter phases of investigating and reflecting, designing, prototyping, and testing. Additionally, collaboration is an important tool at any phase of development, because considering multiple perspectives allows for improvement of innovations.
1. Backend Debugging (Postman)
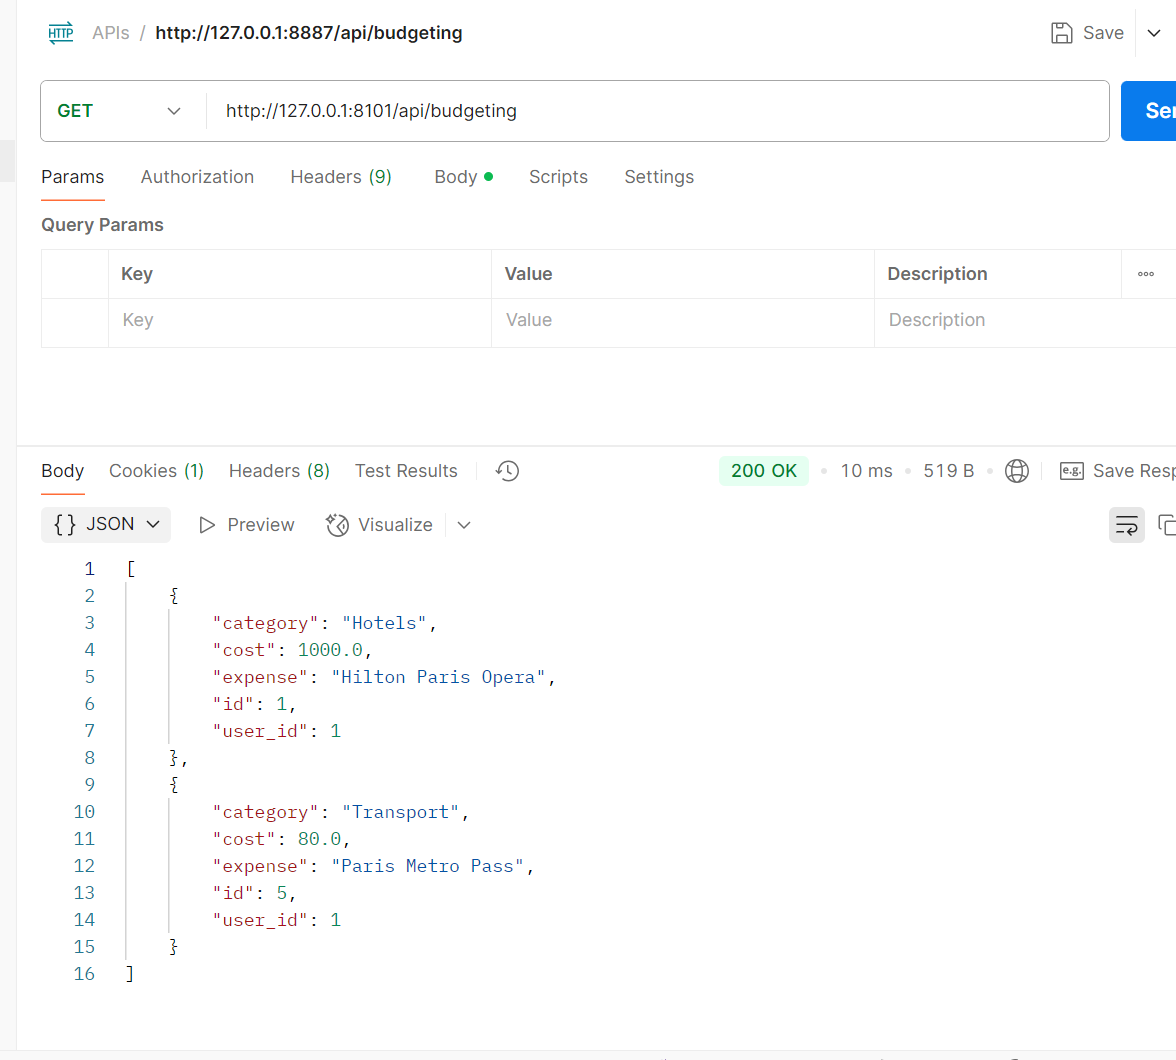
- I used postman in order to send get, post, put, and delete requests to the backend and by passing certain bodies to check whether the API was working properly or not.
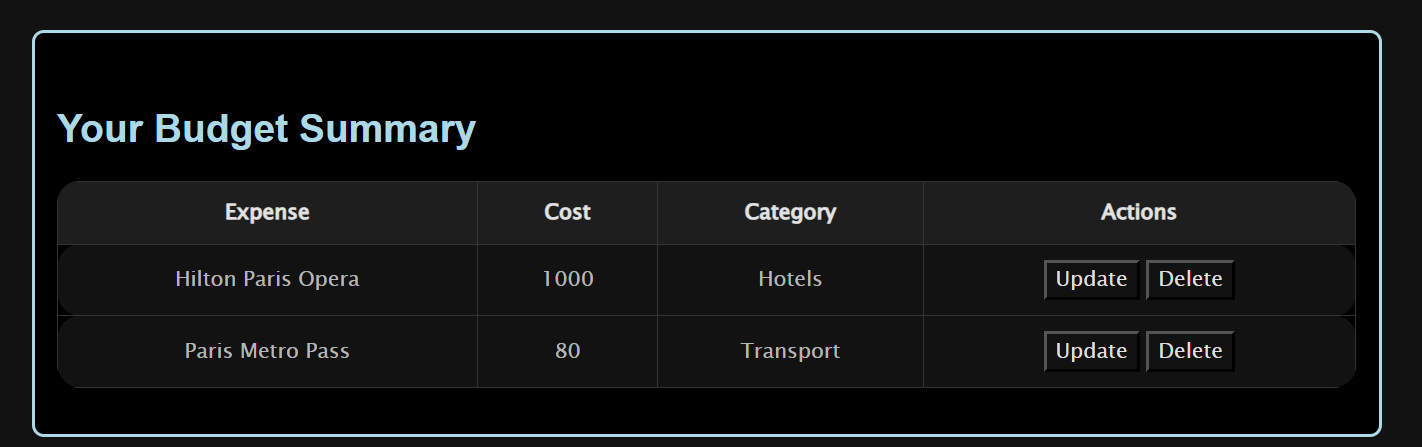
2. Frontend Debugging (Console)

- I used the console on the frontend in order to use the Frontend features like the update rates and see whether the request to the backend in order to execute the request to the API was working properly or not.
- In this example, the user is not logged in, so they can’t view thier personal entries
3. Testing(Proper Data)
def initBudgeting():
    with app.app_context():
        db.create_all()

        test_data = [
            Budgeting(expense="Hilton Paris Opera", cost=1000, category="Hotels", user_id=1),
            Budgeting(expense="Groceries", cost=50, category="Food", user_id=2),
            Budgeting(expense="Paris Metro Pass", cost=80, category="Transport", user_id=1),
        ]

        for entry in test_data:
            try:
                entry.create()
                print(f"Record created: {repr(entry)}")
            except IntegrityError:
                db.session.remove()
                print(f"Record exists or error: {entry.expense}, {entry.cost}, {entry.category}, {entry.user_id}")
- I created authentic and real-looking users and ratings to supplement m feature with actual test data, and not just “hello” or “123”
4. All Postman Requests
Get
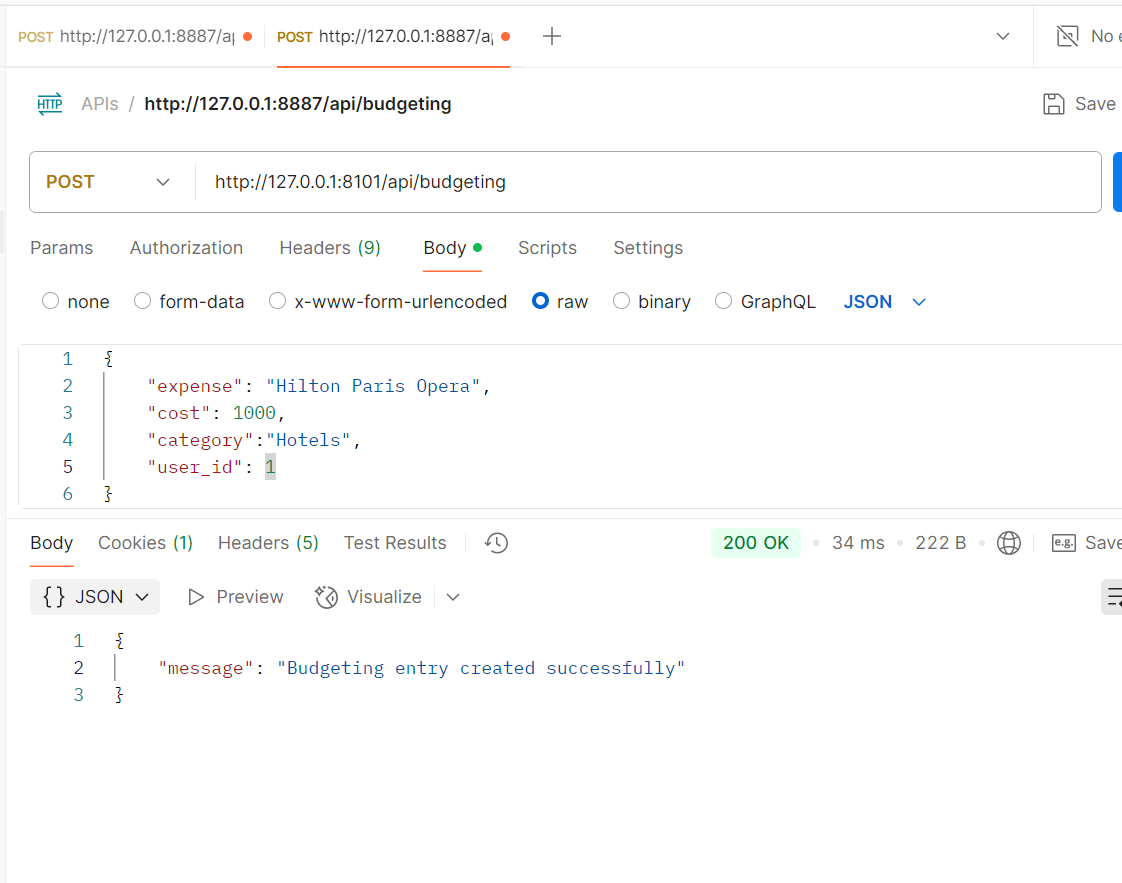
Post
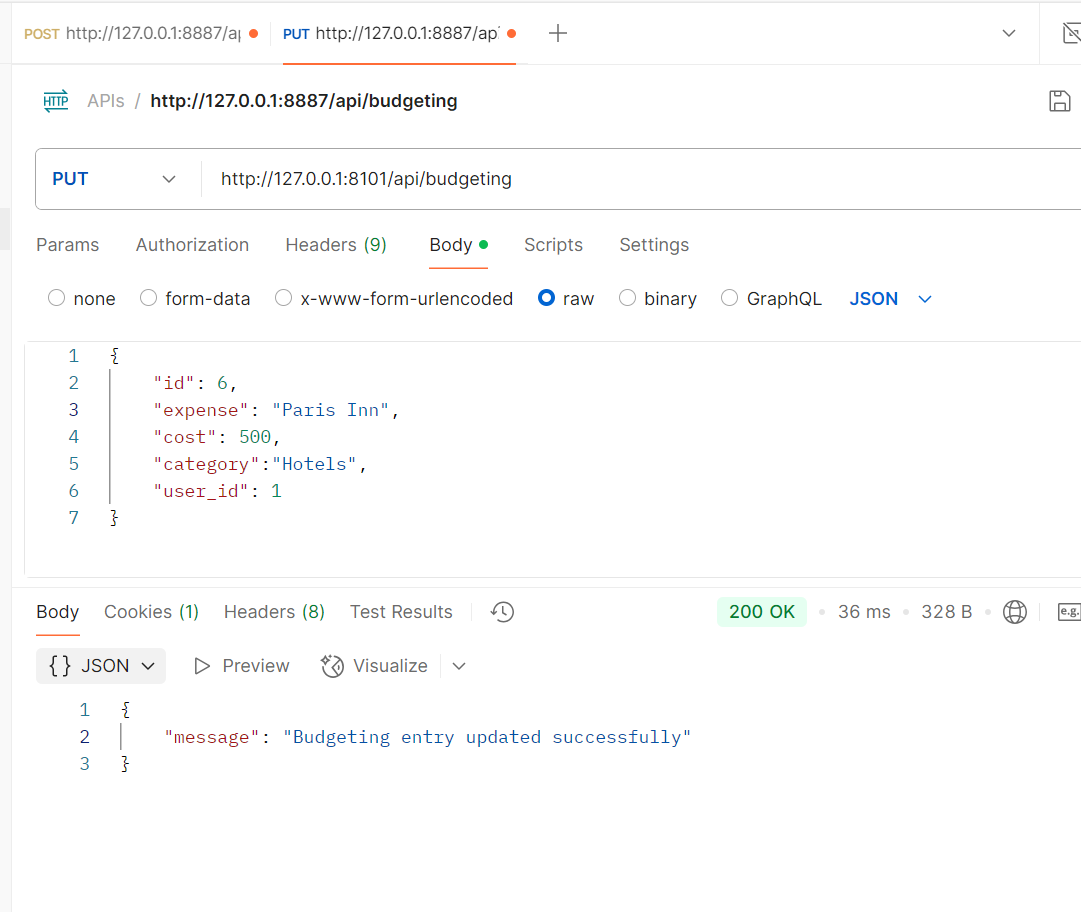
Put/Update
Delete
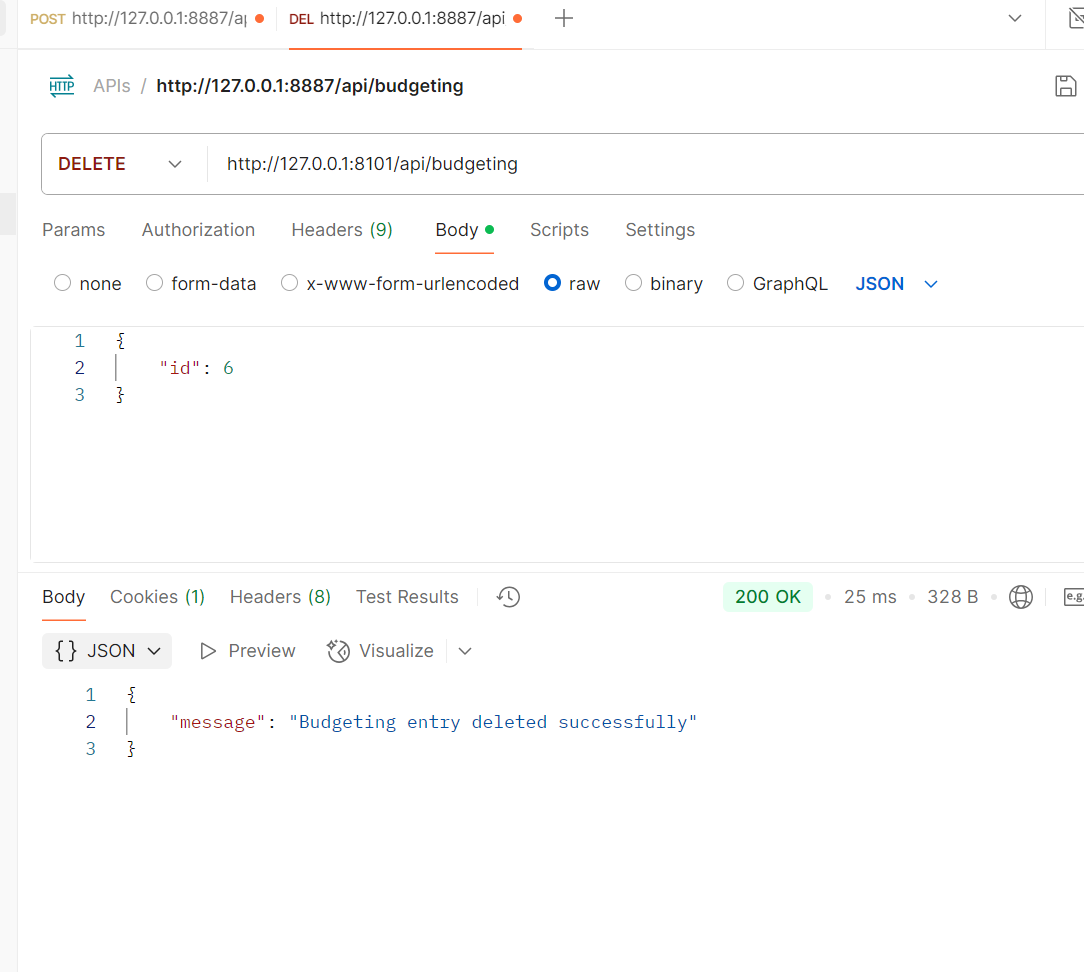
Using Postman to send requests to the backend allowed me to test the API endpoint and make sure they were functioning properly, and helping me find any issues early on. By checking the frontend console, I was also able to track errors, log the errors and other outputs, and monitor the responses in real-time, making debugging much easier. Together, these tools helped streamline the development process by providing the outputs and show me what is going on in both the backend and frontend.
BIG IDEA 2: DATA (DAT)
Data are central to computing innovations because they communicate initial conditions to programs and represent new knowledge. Computers consume data, transform data, and produce new data, allowing users to create new information or knowledge to solve problems through the interpretation of those data. Computers store data digitally, which means that the data must be manipulated in order to be presented in a useful way to the user.
1. Database Management with SQLite:
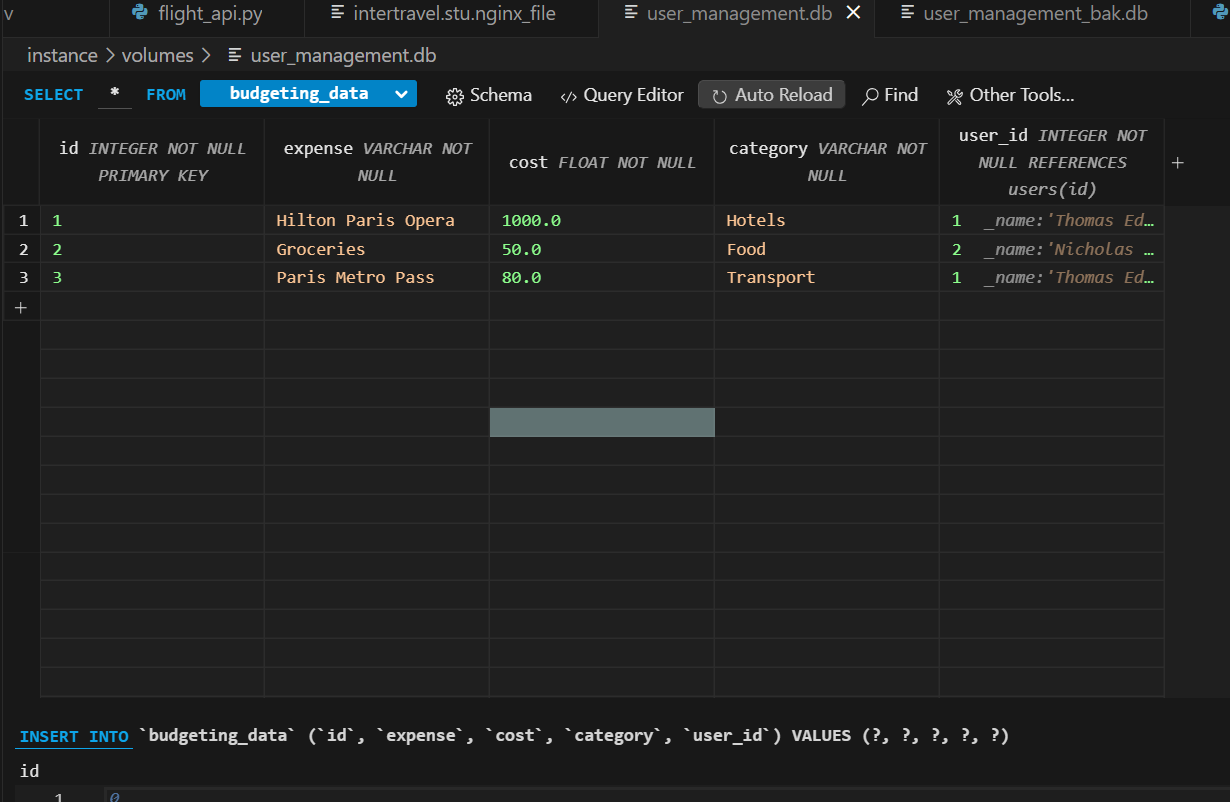
“budget_data” Table Columns, and data management/organization
-
This is my Budgeting Data table in the database, which stores a unique id for each entry in the first column.
-
It stores the actual data values, whcih are expense, cost, and category in 3 seperate columns
- It stores the user_id associated with the user that created that rating, and when joined with the user.py api which is associated with each rating.
__tablename__ = 'budgeting_data'

id = db.Column(db.Integer, primary_key=True)
expense = db.Column(db.String, nullable=False)  # Name of the expense (e.g., "Rent", "Groceries")
cost = db.Column(db.Float, nullable=False)  # The cost for the expense
category = db.Column(db.String, nullable=False)  # Expense category (e.g., "Housing", "Food")
user_id = db.Column(db.Integer, db.ForeignKey('users.id'), nullable=False)  # Linked to the user who created the budgeting data

def __init__(self, expense, cost, category, user_id):
    self.expense = expense
    self.cost = cost
    self.category = category
    self.user_id = user_id
The Code
In my budgeting api’s model file I have defined the different columns, and where each value that is entered should go on the table, as well as what type of data should be in each.
- For instance, aexpense is stored as a string and cost is an integer
- primary_key=True insures the id of each entry is unique
2. Data Upload and Storage
Retrieving Data from the Request
@token_required()
def post(self):
    current_user = g.current_user
    data = request.get_json()

    budgeting = Budgeting(
        expense=data.get('expense'),
        cost=data.get('cost'),
        category=data.get('category'),
        user_id=current_user.id
    )
Data(Rating) Validation
if not data or 'expense' not in data or 'cost' not in data or 'category' not in data:
    return jsonify({"message": "Expense, cost, and category are required"}), 400
try:
    cost = int(cost)
except ValueError:
    return jsonify({"message": "Cost must be an integer"}), 400
Adding the data to the table
# Create a new budget entry
budgeting = Budgeting(
    expense=data.get('expense'),
    cost=data.get('cost'),
    category=data.get('category'),
    user_id=current_user.id
)

db.session.add(budgeting)
db.session.commit()

return jsonify({"message": "Budgeting entry created successfully"})
-
Takes in data from the request
-
Then, validates whether the rating and other data is valid, and ready to add to the table
-
Adds the data to the table, formatting it into columns with
- expense
- pcost
- category
- user_id
Thus, the entry is successfully added to the table, and linked with the user_id that created it.
3. Data Security
async function getCurrentUserId() {
        try {
            const response = await fetch(`${pythonURI}/api/id`, fetchOptions);
            if (!response.ok) throw new Error("Failed to fetch user ID");

            const userData = await response.json();
            USER_ID = userData.id;
            createBudgetingTable(); // Fetch entries after getting user ID
        } catch (error) {
            console.error("Error fetching user ID:", error);
        }
    }
async function fetchAndDisplayBudgeting() {
    try {
        const response = await fetch(`${pythonURI}/api/budgeting?user_id=${USER_ID}`, fetchOptions);
        const data = await response.json();
        const displayElement = document.getElementById('budgeting-display');
Users specific Entry Table
This is a code segment from the the function that displays the budgeting entries table on the frontend, and it helps create security for the data on the website.
- Only the entries associated with the current logged in user is displayed on the table, so users cannot edit or see other user’s entries.
- Function to get current user_id using existing /id endpoint in user API, saves as a variable
- fetchAndDisplayBudgeting() will call the endpoint
budgeting?user_id=${USER_ID}, which queries and filters the database based on the user_id, only giving back the budgeting entries for the said user, which is displayed in the table.
@token_required()
Token Required
All users who are trying to access their budgeting entry data must be logged in, and the token required feature allows for that, and prevents users not logged in from accessing the data.
4. Data Retrieval and Display
Get Request
Retrieve data from the frontend
data = request.get_json()
Validate the data
if not data or 'expense' not in data or 'cost' not in data or 'category' not in data:
    return jsonify({"message": "Expense, cost, and category are required"}), 400
Queries
def get(self):
    current_user = g.current_user
    budgeting_entries = Budgeting.query.filter_by(user_id=current_user.id).all()
    return jsonify([entry.read() for entry in budgeting_entries])
The code queries through the “budgeting_data” table, filtering by the current user id, and returns all of the data associated with all of the entries found with that user id.
Frontend Code
const response = await fetch(`${pythonURI}/api/budgeting?user_id=${USER_ID}`, fetchOptions);
const data = await response.json();
The code recieves the data associated with a particular user_id in the backend in the form of a json, which it can then use to display on the frontend.
Displays on Frontend
Big idea 4
The main focus of big idea 4 is toward the internet, ip addresses, protocols, and for us, deployment
AWS
AWS is Amazon Web Services, and all of the groups in our class use the same AWS server to deploy our projects onto. intertravel.stu.nighthawkcodingsociety.com to deploy the Flask backend. We also added the repository to COckpit to update it anytime in a class shared repository.
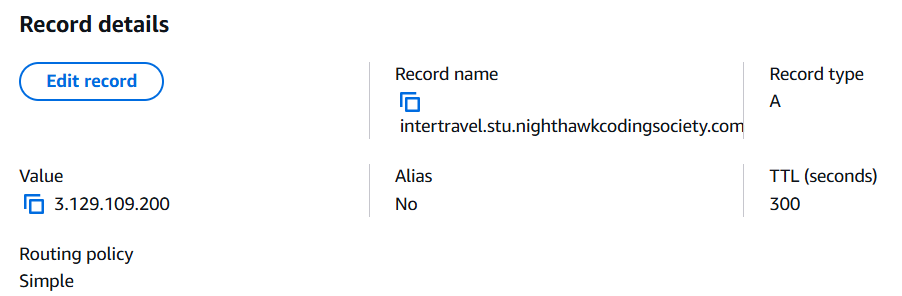
DNS
DNS stands for domain name service and what it does for us is that it maps a certain domain name to an IP address so the domain that we are using for the deployed project is intertravel.stu.nighthawkcodingsociety.com, and it maps this to the ip address of 3.129.109.200.
HTTP
We use HTTP method in order to send requests to API endpoints to take advantage of our background through POST, GET, PUT, and DELETE requests allowing the user to create ratings on my website and interact using these other features.
Security
In the nginx file, we set it so the only domain that can send API requests to the backend is https://kiruthic-selvakumar.github.io. We also used Certbot to enforce HTTPS and encrypt the website to ensure that it is fully secure. nginx file:
 server {
    server_name intertravel.stu.nighthawkcodingsociety.com;
    location / {
        proxy_pass http://localhost:8101;

        # Preflighted requests
        if ($request_method = OPTIONS ) {
                add_header "Access-Control-Allow-Credentials" "true" always;
                add_header "Access-Control-Allow-Origin" "https://kiruthic-selvakumar.github.io" always;
                add_header "Access-Control-Allow-Methods" "GET, POST, PUT, DELETE, OPTIONS, HEAD" always; # Make sure the request methods above match here
                add_header "Access-Control-Allow-MaxAge" 600 always;
                add_header "Access-Control-Allow-Headers" "Authorization, Origin, X-Requested-With, Content-Type, Accept" always;
                return 204;
        }
    }

    listen [::]:443 ssl; # managed by Certbot
    listen 443 ssl; # managed by Certbot
    ssl_certificate /etc/letsencrypt/live/intertravel.stu.nighthawkcodingsociety.com/fullchain.pem; # managed by Certbot
    ssl_certificate_key /etc/letsencrypt/live/intertravel.stu.nighthawkcodingsociety.com/privkey.pem; # managed by Certbot
    include /etc/letsencrypt/options-ssl-nginx.conf; # managed by Certbot
    ssl_dhparam /etc/letsencrypt/ssl-dhparams.pem; # managed by Certbot

}
server {
    if ($host = intertravel.stu.nighthawkcodingsociety.com) {
        return 301 https://$host$request_uri;
    } # managed by Certbot


    listen 80;
    listen [::]:80;
    server_name intertravel.stu.nighthawkcodingsociety.com;
    return 404; # managed by Certbot
}